
How Cadavers Help Teach Peripheral Nerve Anatomy
Jan 21, 2026
Cadavers are an indispensable tool for teaching peripheral nerve anatomy, offering hands-on experience that textbooks and simulations can't replicate. They help medical students and professionals understand nerve structures, improve procedural skills, and reduce risks during surgeries and regional anesthesia. Here's why cadaver-based learning is so effective:
- Realism: Fresh frozen cadavers closely mimic living tissue, providing a realistic feel for procedures like nerve blocks and dissections.
- Anatomical Variations: Cadavers expose students to natural differences in human anatomy, which standardized models can't offer.
- Practice Without Risk: Students can refine their skills without fear of harming live patients.
- Improved Outcomes: Studies show significant learning improvements, like a 91% success rate in identifying nerve structures with ultrasound after cadaver-based training.
Cadaver labs also teach critical techniques for nerve repair, mapping, and regional anesthesia. While virtual tools are helpful for preparation, cadavers remain the gold standard for mastering anatomy and building confidence in clinical settings.
Preparing Cadavers for Peripheral Nerve Dissection
Ethical Sourcing and Preservation of Cadavers
The use of cadavers in education begins with obtaining informed consent from donors. Every donor must provide written consent specifying how their body will be used for academic purposes. The International Federation of Associations of Anatomists (IFAA) emphasizes that only donated bodies should be used for educational purposes, explicitly discouraging the use of unclaimed bodies.
"Informed consent lies at the heart of the ethical use of cadavers." – RISC Staffing
Financial transactions involving cadavers are strictly regulated. Fees paid to sourcing agencies are limited to covering transportation, preparation, and cremation expenses. For instance, in 2023, the University of Pittsburgh Medical Center obtained seven fresh cadaver upper extremities from the Anatomy Gifts Registry in Hanover, MD, at approximately $350 per limb. These specimens were used to train healthcare professionals in ultrasound-guided peripheral nerve blockade.
Maintaining the dignity of donors is a critical part of the process. Dissection protocols are designed to ensure respect, often covering the face and genitals during procedures. Many institutions also hold memorial services to honor the donors. Additionally, cadavers are carefully screened, and those with transmissible diseases, significant decomposition, or prior organ donations for transplant are excluded from use.
Once cadavers are ethically sourced and preserved, the focus shifts to using the appropriate tools and following strict safety measures for effective dissection.
Required Tools and Safety Protocols
After ensuring cadavers are ethically prepared, the preservation method and tools used play a crucial role in achieving effective dissection. The choice of preservation depends on the educational goal. For regional anesthesia training, fresh frozen cadavers are preferred because they closely mimic the texture and ultrasound imaging of living tissue. In contrast, formalin-preserved cadavers, often used for long-term study, provide firmer tissues that differ from the feel of live anatomy. Fresh limbs must be kept cool until their use to prevent tissue degradation.
Standard tools for dissection include scalpels, scissors, and forceps. However, accessing deeper structures like the brachial or lumbosacral plexus requires specialized equipment such as Kerrison rongeurs, bone chisels, rubber mallets, and Dremel 3000 tools. In 2023, students at the Philadelphia College of Osteopathic Medicine utilized these tools under guidelines from the State Anatomical Board of Pennsylvania to preserve entire nerve plexuses, extending from the spinal cord to the fingertips.
Safety protocols are equally important. Before beginning dissections, participants attend safety briefings that outline techniques, hygiene practices, and the day’s schedule. For ultrasound-guided nerve block training, students use small amounts (3 to 5 mL) of saline to visualize the spread around target nerves without compromising the anatomy for subsequent learners. Methylene blue can also be injected to trace the simulated anesthetic's distribution and confirm accurate targeting of the nerve.
Key Steps in Peripheral Nerve Dissection
Dissecting the Brachial Plexus
When working with the brachial plexus, identifying key landmarks is essential. This structure is organized into roots (C5-T1), trunks, divisions, cords, and branches. Dissection typically begins by locating the trunks between the anterior and middle scalene muscles in the posterior triangle of the neck.
For a more detailed view of the distal branches, the antero-axillary approach is useful. However, a posterior subscapular incision - made between the medial border of the scapula and the spine, with lateral retraction of the scapula - provides full exposure of the plexus while minimizing tissue disruption.
"The brachial plexus is well-suited to teaching... because it can be exposed by students with minimal dissection and destruction of surrounding tissues, unlike the lumbosacral plexus, which is found in the deep concavity of the pelvis." – Annals of Anatomy
To trace the nerves, start distally by identifying the musculocutaneous nerve as it enters the coracobrachialis, then follow it back to the lateral cord. The cords themselves are identified based on their relationship to the axillary artery. A helpful feature in the axilla is the distinctive "M" formation created by the musculocutaneous, median, and ulnar nerves, which serves as a quick reference point.
Keep in mind that variations in nerve patterns occur in more than 33% of cases. This makes careful fascia removal essential to reveal the true arrangement of the nerves.
Mapping the Lumbosacral Plexus
After gaining confidence with the brachial plexus, the next step is tackling the lumbosacral plexus. This region is more challenging due to its deep pelvic location. The lumbar plexus (L1-L4) forms within or behind the psoas major muscle, while the sacral plexus (L4-S3) is located on the anterior surface of the piriformis muscle.
The psoas major muscle serves as a key landmark. Nerves like the femoral and lateral femoral cutaneous emerge from its lateral border. The sciatic nerve, the largest peripheral nerve in the body, varies in size from 1 to 20 mm and can be exposed along the piriformis.
Dissection in this area requires attention to detail. For example, intermesenteric nerves, which pass posterior to the left renal vein, demand a layer-by-layer approach. Similarly, recognizing that certain nerves, such as the long thoracic and dorsal scapular nerves, pierce muscles (like the middle scalene) helps avoid accidental damage during muscle reflection.
Accurate mapping of the lumbosacral plexus is essential for procedures like regional anesthesia.
Examining Cranial Nerve Branches
Peripheral nerve dissection isn’t limited to the limbs - it extends to the intricate cranial nerve branches, providing a thorough understanding of peripheral anatomy. Cranial nerve dissection begins by tracing nerves from identifiable landmarks. By identifying the muscles a nerve innervates, students can trace it back to its origin, ensuring the preservation of delicate nerve branches.
In areas such as the aortic plexus, ganglia can be differentiated from nerves by spotting "dark spots" within the nervous tissue. These spots represent unmyelinated neuron cell bodies, making them visually distinct from typical nerves.
Clinical Applications of Cadaver-Based Learning
Practicing Peripheral Nerve Blocks
Cadaver dissection bridges the gap between theoretical knowledge and clinical application, especially when it comes to peripheral nerve blocks, a fundamental technique in regional anesthesia. Fresh-frozen cadavers offer ultrasound images that closely resemble those seen during live procedures, making them an invaluable tool for practice. They allow students to identify nerves, muscles, and fascia while experiencing the actual resistance of tissue when advancing a needle - something synthetic models simply can't replicate. At the Hospital for Special Surgery (HSS) in New York, methylene blue injectate is used during cadaver lab sessions to demonstrate how local anesthetics spread around a target nerve. This hands-on experience helps fellows refine their injection techniques before transitioning to patient care.
Cadavers also provide a risk-free environment for studying complications. Students can observe and understand the consequences of errors, such as pneumothorax or intravascular injection, without endangering patients. After performing a simulated block, they can dissect the area to verify if they successfully targeted the correct structure.
This practical training equips learners with the skills to handle surgical challenges, including those involved in nerve repair.
Studying Nerve Injury and Repair Techniques
Beyond peripheral nerve blocks, cadaver dissection is essential for mastering nerve repair and reconstruction. These procedures demand precision and a thorough understanding of three-dimensional anatomy. Through cadaver labs, students can practice techniques like nerve decompression, repair, and reconstruction, honing the skills required for these intricate surgeries.
The impact of such training is evident: in one study, residents participating in a one-day cadaver lab saw their anatomy test scores jump from a pre-test average of 2.6 out of 8 to a post-test average of 6.3 out of 8. By tracing surgical instruments through real tissue layers, students gain a deeper understanding of structural resistance and the pathways their tools traverse.
Cadavers also allow students to study nerves like the saphenous and sural nerves, helping them determine the ideal lengths and diameters for harvesting grafts used in nerve repair. This knowledge is particularly critical given that, as of 2017, over 40% of U.S. counties had no surgeons available per 100,000 residents. Early identification of nerve injuries and timely referrals to specialists are crucial.
"Education of medical students about the urgency of injury identification and referral to a peripheral nerve surgeon in a timely manner is most important." – Dr. Erica B. Lee, Johns Hopkins School of Medicine
To support students and educators in advancing their clinical expertise, the Institute of Human Anatomy offers cadaver-based courses and digital tools. These resources provide a hands-on, immersive experience for mastering techniques like ultrasound-guided nerve blocks and peripheral nerve repair, seamlessly connecting classroom learning to patient care.
Brachial Plexus EXPLAINED! (Using a Cadaver)
Cadaver-Based vs. Virtual Learning Methods
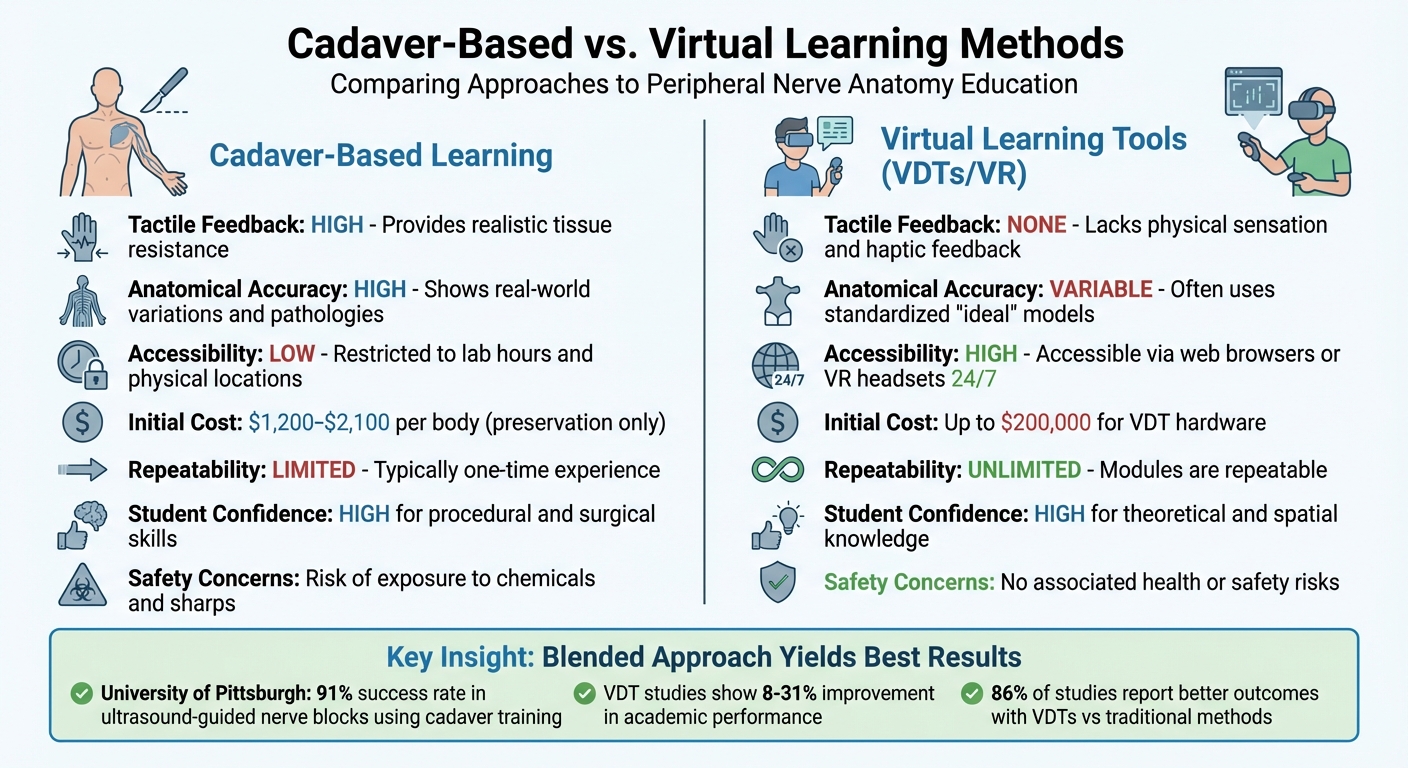
Cadaver-Based vs Virtual Learning Methods for Peripheral Nerve Anatomy Education
When it comes to teaching peripheral nerve anatomy, both cadaver-based dissection and virtual learning platforms bring distinct advantages to the table. Here's a closer look at how these methods differ, helping educators and students make informed choices.
Working with real cadavers offers a tactile experience that no virtual tool can replicate. The natural resistance and texture of real tissue are critical for developing surgical dexterity. As Teodora Telecan from the Department of Anatomy and Embryology explains:
"Virtual dissection should supplement rather than replace traditional methods... they cannot replicate tactile feedback and hands-on skill development."
On the other hand, virtual dissection tables (VDTs) and 3D platforms provide unmatched convenience. They allow unlimited, on-demand practice, which enhances spatial understanding and theoretical knowledge. Research shows that using VDTs can improve academic performance, with score increases ranging from 8% to 31%, and 86% of studies reporting better outcomes compared to traditional methods.
Cadaver-based learning also exposes students to the natural variability found in human anatomy, such as differences in nerve branching and fascial patterns. This realism prepares students for the unpredictability of patient care. Virtual platforms, while highly detailed, often rely on standardized, idealized models. A 2014 study by Andrew J. Saltarelli at Stanford University highlighted the superiority of cadaver labs over multimedia simulations in tests of identification and explanatory knowledge.
Comparison Table: Cadaver Learning vs. Virtual Tools
The table below summarizes the key differences:
| Feature | Cadaver-Based Learning | Virtual Learning Tools (VDTs/VR) |
|---|---|---|
| Tactile Feedback | High; provides realistic tissue resistance | None; lacks physical sensation and haptic feedback |
| Anatomical Accuracy | High; shows real-world variations and pathologies | Variable; often uses standardized "ideal" models |
| Accessibility | Low; restricted to lab hours and physical locations | High; accessible via web browsers or VR headsets 24/7 |
| Initial Cost | $1,200–$2,100 per body (preservation only) | Up to $200,000 for VDT hardware |
| Repeatability | Limited; dissection is typically a one-time experience | Unlimited; modules are repeatable |
| Student Confidence | High for procedural and surgical skills | High for theoretical and spatial knowledge |
| Safety Concerns | Risk of exposure to chemicals and sharps | No associated health or safety risks |
Blending these two approaches often yields the best results. For example, at the University of Pittsburgh Medical Center, students achieved a 91% success rate in ultrasound-guided nerve blocks using $350 fresh cadaver limbs after just four 90-minute sessions. Meanwhile, the Virtual Peripheral Nerve Academy at Johns Hopkins School of Medicine uses the BioDigital platform to offer over 25 modules, covering topics like brachial plexus injury. These examples show how virtual tools can be excellent for preparation and review, while cadaver labs provide the hands-on skills critical for patient care.
Institutions like the Institute of Human Anatomy are also bridging the gap by offering courses and digital guides that combine the strengths of both methods, ensuring a well-rounded anatomical education.
Conclusion
Cadaver-based learning continues to be the gold standard for mastering peripheral nerve anatomy. The hands-on experience with fresh or fresh-frozen specimens allows students to physically feel tissue resistance during needle placement and better understand the three-dimensional relationships of anatomical structures. This type of training has proven highly effective in helping learners develop essential skills.
Key Takeaways for Students and Educators
For educators, the priority should be clear: maximize hands-on cadaver time. Design your curriculum to combine ultrasound techniques with traditional dissection and aim to keep the student-to-specimen ratio low - ideally no more than two students per cadaver. Incorporating methylene blue injections during simulated nerve blocks can help students visualize how anesthetics spread, creating a stronger connection between theory and practice.
Students, on the other hand, should approach cadaver labs with purpose. Make sure to complete your pre-lab readings, actively participate rather than just observing, and view mistakes as opportunities to deepen your understanding of complex anatomy. A study found that 92% of neurosurgical residents believed practicing in a dissection lab significantly enhanced their readiness for the operating room.
Additionally, fresh cadavers provide ultrasound images that closely replicate what you’d encounter in real operating room conditions. This realistic experience reinforces the idea that a deep understanding of anatomy is the "sine qua non" of regional anesthesia.
FAQs
Why are fresh frozen cadavers ideal for studying peripheral nerve anatomy?
Fresh frozen cadavers are prized for the study of peripheral nerve anatomy because they retain the natural texture, color, and flexibility of human tissues. This preservation method offers an experience that closely resembles working with living tissue, making it an invaluable tool for hands-on learning.
With fresh frozen cadavers, students and educators can explore and manipulate peripheral nerves more effectively. This approach provides a realistic and practical way to deepen their understanding of intricate anatomical structures.
How do cadaver labs enhance the effectiveness of nerve block training?
Cadaver labs offer a hands-on, three-dimensional learning experience that goes far beyond what textbooks or virtual models can provide. Working with real human specimens gives students a much clearer picture of the exact pathways of peripheral nerves and their relationships to muscles, blood vessels, and nearby structures. This direct, tactile experience also allows learners to practice needle placement with realistic resistance, helping to build both confidence and precision.
When combined with ultrasound, cadaver models provide an opportunity for trainees to see nerves and surrounding tissues in a way that closely resembles live patients. This pairing sharpens hand-eye coordination, enhances accuracy in needle placement, and deepens understanding of how fluids spread during injections. Research consistently shows that cadaver-based training leads to better success rates for nerve blocks and fewer complications in clinical practice.
The Institute of Human Anatomy supports this learning approach by offering interactive cadaver-based courses, videos, and digital resources. These tools are designed to help students and educators apply advanced techniques effectively, ensuring safer and more precise procedures in clinical settings.
What ethical considerations guide the use of cadavers in medical education?
The use of cadavers in medical education hinges on three key principles: informed consent, respect for donor dignity, and responsible stewardship. For a donation to occur, individuals must willingly agree through a legally documented process, fully understanding how their bodies will be utilized. Medical institutions, in turn, are tasked with treating cadavers with the same level of respect and privacy afforded to living patients, honoring both the donors and their families.
Cadavers are reserved exclusively for legitimate educational or research purposes. This involves maintaining thorough documentation and following strict protocols to prevent unnecessary handling or waste. Transparency plays a crucial role as well - many programs provide families with the opportunity to learn how the donation contributed to medical education or research. Institutions like the Institute of Human Anatomy uphold these ethical standards, ensuring that cadaveric donations are treated with care and respect, which helps build public trust and supports the advancement of medical training.

