
5 Drills to Boost Neuromuscular Coordination
Apr 27, 2026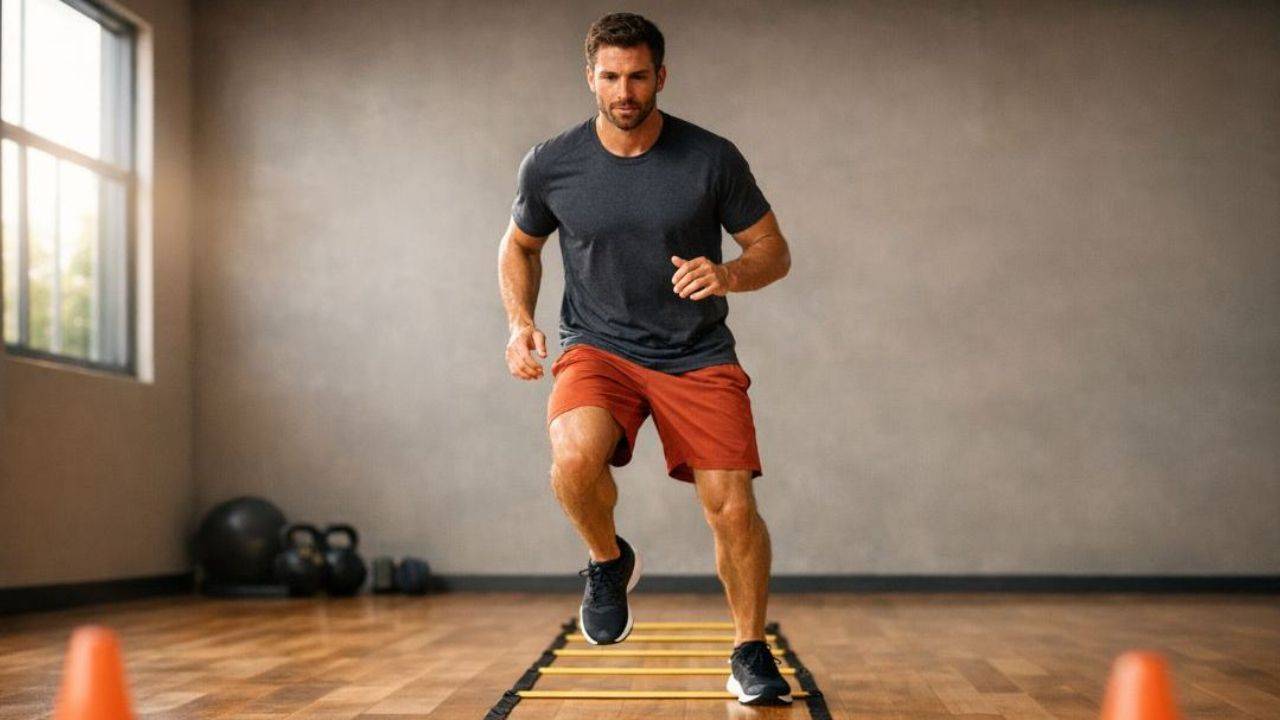
Neuromuscular coordination is the link between your brain and muscles that ensures smooth, efficient, and controlled movements. Whether you're an athlete or just looking to move better in daily life, improving this communication can enhance balance, precision, and stability while reducing injury risks.
How the Body Builds Incredible Strength Without Getting Bigger
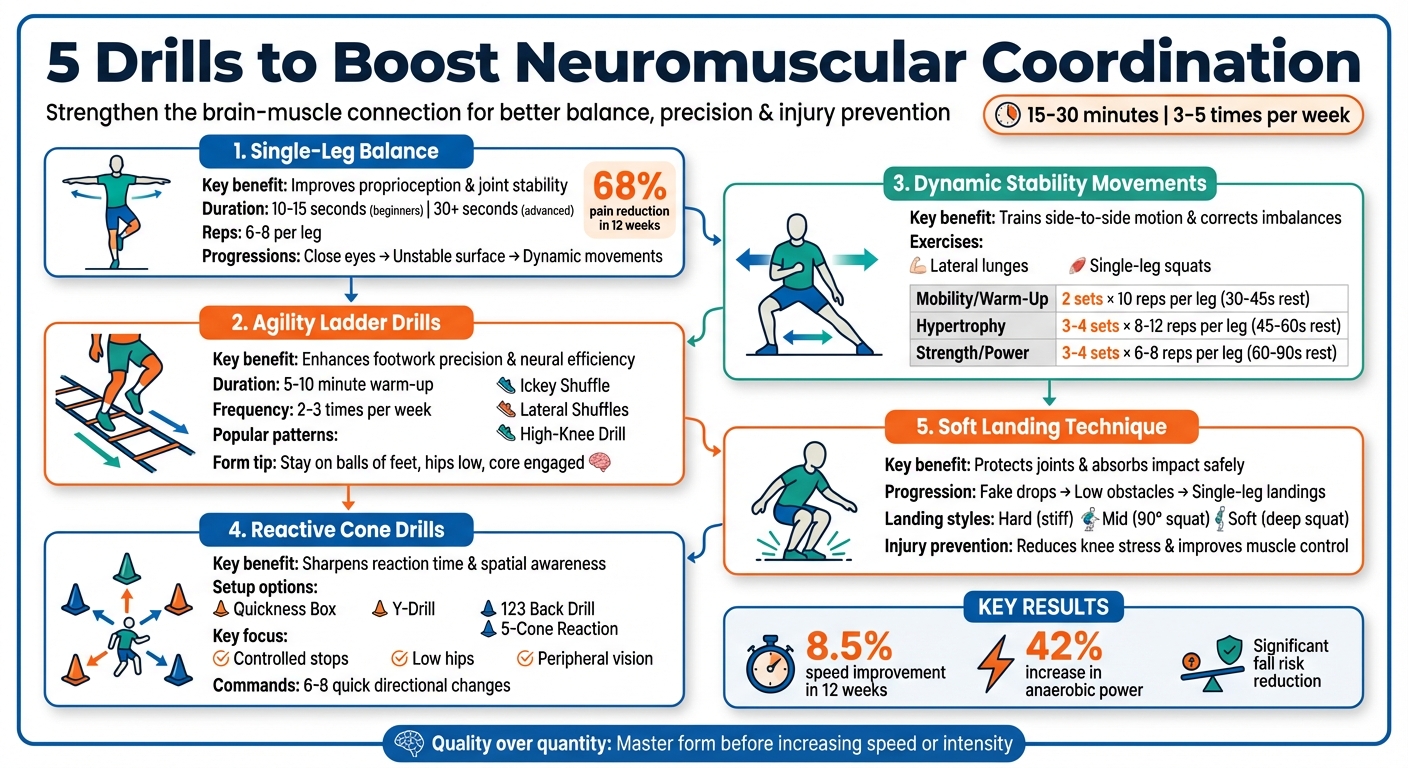
Here are five effective drills to strengthen this connection:
- Single-Leg Balance: Improves proprioception and joint stability. Progress by closing your eyes or using unstable surfaces.
- Agility Ladder Drills: Focuses on precise footwork and quick changes in direction for better neuromuscular coordination and movement efficiency.
- Dynamic Stability Movements: Exercises like lateral lunges and single-leg squats train side-to-side motion and address muscle imbalances.
- Reactive Cone Drills: Simulates unpredictable scenarios to sharpen reaction time and spatial awareness.
- Soft Landing Techniques: Teaches safe, controlled landings to protect joints and absorb impact effectively.
Perform these drills consistently (15–30 minutes, 3–5 times a week) with proper form to maximize results. They not only improve athletic performance but also help prevent falls and injuries in everyday activities.
5 Neuromuscular Coordination Drills for Better Balance and Performance
Advanced Neuromuscular & Balance Exercise Progression - LEVEL 1 (No Band) (1 of 6)
Drill 1: Single-Leg Balance
Single-leg balance is a key exercise for improving proprioception, which is your body's ability to sense and control movement. It works muscles from your ankles to your core, creating a "protective scaffolding" around lower-body joints to enhance stability. Fun fact: a large portion of each walking step is spent in single‑leg support, so balancing on one leg is a highly relevant everyday skill.
How to Perform Single-Leg Balance
Start by standing with your feet shoulder-width apart on a flat, stable surface. Shift your weight onto one foot and lift the other, moving the heel toward your glutes. Use your hand to hold the raised foot or ankle, while extending your opposite arm in front of you for counterbalance. Keep your posture upright, engage your core, and focus your gaze on a fixed point a few feet ahead to help maintain stability. Don’t forget to breathe steadily throughout the drill.
If you're new to this, aim to hold the position for 10–15 seconds per leg. More experienced individuals can try holding for 30 seconds or longer. Perform 6–8 repetitions on one leg before switching to the other. If you're feeling unsteady, position yourself near a support for safety, and stop immediately if you experience any pain.
Nailing the basic form prepares you for more advanced versions of this drill.
Progressions for Increased Difficulty
Once you've got the hang of the basic move, you can up the ante. For a moderate challenge, keep your free arm by your side instead of reaching it out - this removes some of the counterbalance, forcing your stabilizing muscles to work harder. To take it further, try closing your eyes. This removes visual cues and makes you rely entirely on proprioception.
For an even greater challenge, perform the drill on an unstable surface like a pillow, balance pad, or yoga mat. This will push your stabilizing muscles to engage even more. You can also add dynamic movements, such as extending your lifted leg in different directions or rotating your torso while maintaining balance.
Benefits of Single-Leg Balance
This exercise strengthens important muscle groups, including the ankle stabilizers (peroneal and tibialis muscles), calves, thighs, hips, and core. It also enhances joint stability in the ankles, knees, and hips, which can help reduce the risk of falls and lower-body injuries. Interestingly, being able to hold a one-legged stance for 10 seconds has been associated with higher survival rates in middle‑aged and older adults, suggesting one‑leg balance is a useful marker of overall health.
Additionally, physical therapy programs that include single‑leg balance and other neuromuscular drills often report meaningful reductions in pain and improvements in function over the first few months of treatment, depending on the condition and program design, proving its value for both injury prevention and performance improvement.
Mastering this exercise sets the stage for tackling more dynamic balance drills in the next steps.
Drill 2: Agility Ladder Drills
Agility ladder drills are a fantastic way to fine-tune neuromuscular control. By focusing on quick and precise footwork, these drills can serve as a great 5–10 minute warm-up to prepare your body for more intense activities.
Since these drills require quick bursts of movement and focus, having a small source of energy beforehand can help maintain performance.
Common Agility Ladder Patterns
Some popular agility ladder patterns include:
- Ickey Shuffle: This "in-in-out" rhythm challenges coordination and foot placement.
- Lateral Shuffles: Ideal for improving hip stability and side-to-side movement.
- In-and-Out Pattern: Focuses on building foot speed and quickness.
- High-Knee Drill: Encourages explosive leg drive and dynamic movement.
Tips for Proper Form
To get the most out of agility ladder drills, proper form is key:
- Stay on the balls of your feet for quicker movements and better energy return.
- Keep your hips low and your core engaged to stabilize during rapid changes in direction.
- Move your arms in sync with your legs, keeping them bent at about 90 degrees to maintain balance and rhythm.
- Start slowly to master the movement pattern, then gradually increase speed as your confidence grows. Focus on rhythm first - speed will naturally follow.
- For sprint-focused drills, maintain a slight forward lean to mimic real acceleration mechanics.
These small adjustments can make a big difference in how effectively you perform and improve over time.
How Agility Ladder Drills Improve Coordination
When done with proper technique, agility ladder drills do more than just improve footwork - they also strengthen the connection between your brain and your muscles. These drills promote neuromuscular adaptations that improve coordination and make movements faster and more efficient. The structured design of the ladder forces controlled, precise movements in a confined space, which helps improve core stability and body alignment.
Agility ladder drills can improve step timing and change‑of‑direction performance, helping your body move more efficiently and, in some cases, reducing reaction and ground‑contact times. Lateral movements, in particular, help stabilize your hips and trunk, reducing the risk of muscle imbalances. Incorporating these drills into your routine 2–3 times per week can lead to noticeable gains in coordination and quicker reaction times.
Just like single-leg balance drills, agility ladder exercises are an excellent way to refine the brain-to-muscle communication that’s essential for better neuromuscular coordination.
Drill 3: Dynamic Stability Movements
Dynamic stability movements, such as lateral lunges and single-leg squats, are key for training your body to handle side-to-side motion (the frontal plane). This type of movement is often overlooked, as many exercises focus on forward-and-backward motion (the sagittal plane). However, improving stability in the frontal plane is essential for athletic performance and reducing the risk of injuries.
What sets these exercises apart is their ability to enhance neuromuscular coordination. Single-leg movements, in particular, create moments of instability that force your body to make rapid adjustments to maintain balance. These adjustments activate stabilizing muscles in your shoulders, hips, and core that might otherwise remain underused. As Dr. John Rusin puts it:
"The effectiveness of single leg work is highly dependent on movement quality and control, so we must rein in quality by manipulating tempos and rhythms that keep authentic movement patterns strict".
Performing Lateral Lunges
To perform a lateral lunge, start with your feet hip-width apart. Step out to the side, ensuring your step is wide enough to engage both your inner and outer thighs. Shift your weight onto the stepping leg while pushing your hips back rather than dropping straight down. Keep your knee aligned over your toes, avoiding inward collapse. Your opposite leg should remain relatively straight as you lower into the lunge.
The width of your step is crucial. A narrow stance won’t engage your hips and adductors effectively, which are key to this exercise's benefits. Push through your heel to return to the starting position, then repeat on the other side.
Single-Leg Squat Variations
Single-leg squats are excellent for addressing muscle imbalances and building unilateral strength. If you're new to these, use a chair or bench for support. Stand on one leg, extend the other leg forward, and slowly lower yourself until you lightly touch the chair before standing back up.
For those with more experience, try the 1.5-rep split squat. Lower fully into the squat, come halfway up, return to the bottom, and then stand completely. This technique increases the time spent in the unstable bottom position, pushing your neuromuscular system to work harder. Another option is to add an isometric pause at the bottom of a rear foot elevated split squat. This pause helps identify weak areas and strengthens your stability in the most challenging part of the movement.
These variations amplify neuromuscular engagement, paving the way for noticeable improvements in performance.
Benefits of Dynamic Stability Movements
Incorporating dynamic stability exercises promotes neuromuscular adaptations that improve balance and coordination. These movements link major muscles like the glutes, hamstrings, and quads with stabilizers such as the adductors and core, enhancing your body's motor control and balance. Training one side at a time also helps correct imbalances that could lead to injuries.
The ability to perform controlled single‑leg squats without losing balance is often used as a practical screen of lower‑limb movement quality and control, especially around the hips and knees. Lateral lunges, on the other hand, can improve proprioception and neuromuscular control by challenging and strengthening the hip abductors and adductors through a large range of motion. The payoff? Better overall balance, stronger joints, and movement patterns that translate to sports and daily life.
| Goal | Sets | Reps | Rest |
|---|---|---|---|
| Mobility/Warm-Up | 2 | 10 per leg | 30–45 sec |
| Hypertrophy | 3–4 | 8–12 per leg | 45–60 sec |
| Strength/Power | 3–4 | 6–8 per leg | 60–90 sec |
Source: Programming for Lateral Lunges [9]
Drill 4: Reactive Cone Drills
This drill takes dynamic stability up a notch by introducing unpredictable cues, sharpening your reaction time, and enhancing the connection between your brain and muscles. Reactive cone drills simulate the unpredictability of real sports scenarios, where opponents don’t announce their next move. As Danny Takacs, CSCS, puts it:
"At no point during an athletic competition does your opponent tell you what they are going to do next and give you time to prepare for it".
Setting Up Reactive Cone Drills
Setting up these drills is straightforward, but their impact is anything but simple. Here are a few variations to try:
- Quickness Box: Arrange four cones in a square (6–10 feet per side) and number them 1–4. Stand in the center. When your coach calls out a number, sprint to the corresponding cone, touch it, and return to the middle.
- Y-Drill: Place a base cone, a middle cone 10 yards away, and two top cones (numbered 3 and 4) 10 yards from the middle, forming a "Y." Start at the base, sprint to the middle, and then react to your coach’s signal for the final sprint.
- 123 Back Drill: Set three cones in a straight line, five yards apart, with a fourth cone three yards behind the center cone. Your coach will fire off 6–8 quick commands, requiring rapid directional changes.
- 5-Cone Reaction Drill: Arrange five cones in a semi-random or star pattern. Begin at a central point and sprint to the cone your coach calls out.
Each setup challenges your ability to respond quickly and adapt to unpredictable changes, just like in a game.
Staying properly hydrated is important for maintaining reaction speed and coordination during fast-paced drills.
Focus on Controlled Stops
Speed is only half the battle - controlled stops are just as important. As you approach each cone, lower your center of gravity and take small, quick steps to stay balanced. Use the hand matching your direction (left hand for left movement) to touch the cone. This technique naturally keeps your body low and improves weight distribution.
Alan Stein Jr., a performance coach, highlights the importance of precision:
"A great drill... becomes elite when athletes emphasize mechanics over pure effort".
Instead of focusing solely on speed, prioritize sharp, efficient cuts with low hips. Proper hip rotation is key to transitioning from a sprint to a new direction or backpedal. Using your peripheral vision to track cones, rather than looking directly at them, further enhances spatial awareness and reaction speed.
Neuromuscular Benefits of Reaction-Based Drills
Reactive drills don’t just train your body - they train your brain. These exercises improve coordination, reaction time, and spatial awareness while teaching your muscles to respond faster. Research published in The Journal of Australian Strength and Conditioning shows that reactive agility drills enhance perception and response times.
Unlike pre-planned drills, reactive exercises focus on agility in unpredictable scenarios. A study in the International Journal of Sports Physiology and Performance found that planned and reactive agility are distinct skills, meaning pre-programmed drills won’t necessarily translate to better game-time decisions. Beyond mental gains, these drills also strengthen tendons and improve control during sudden stops and changes of direction, which can lower biomechanical risk factors linked to lower‑body injuries.
Reactive cone drills are a powerful tool for building both mental sharpness and physical resilience.
Drill 5: Soft Landing Technique Drills
Jumping is only part of the story - how you land is just as important. A proper landing helps protect your joints and builds strength, while poor landings can lead to injuries. Soft landing drills teach your body to absorb impact effectively, improving the coordination between your muscles and nervous system. Ryan Ford, Founder of Apex School of Movement, explains it best:
"Anyone can throw a big jump or flip, but it's the landing that shows true skill."
Executing the Drill with Proper Form
Begin with "fake drops" to practice landing mechanics with minimal strain. Stand upright, rise onto your toes, and then quickly drop down to mimic a landing. The key is to stabilize immediately upon landing - this shows strong neuromuscular control. Aim to land in a deep squat with your knees and hips aligned to absorb the impact. If you're new to this, you can lightly touch your hands to the ground for added balance.
Progression for Soft Landing Drills
Once you're confident with the basics on flat ground, it's time to up the difficulty. Move to a low obstacle or the edge of a wall, letting your heels hang slightly off the edge. This replicates precision landings and adds the challenge of ankle control and balance. To make it even harder, change your arm positions: start with arms down, then move them behind you, and finally above your head.
You can also try different landing styles:
- Hard landings: Stay stiff and upright for speed.
- Mid landings: Use a 90-degree squat position.
- Soft landings: Sink into a deep squat for maximum impact absorption.
For a final challenge, work on single-leg landings or add box jumps to test your coordination and control.
This progression not only builds your skills but also ensures your body is ready for controlled, safe impacts.
Injury Prevention Through Landing Mechanics
Good landing mechanics aren't just about performance - they're your first line of defense against injuries. These drills activate neural pathways that improve muscle control, helping stabilize your joints and reducing stress on them. By distributing impact forces more through your muscles and less through abrupt joint loading, you can reduce mechanical stresses that are associated with knee problems over time. Over time, repeated landing practice leads to neuromuscular adaptations that make stabilization quicker and more automatic.
Implementation Guidelines for Neuromuscular Drills
To get the most out of neuromuscular drills, sticking to a consistent schedule and smart programming is key. Research on neuromuscular and coordination training often uses about 15–30 minutes per session, 2–3 or more times per week, and reports meaningful improvements in balance, agility, and other performance measures. If that feels like a lot, shorter sessions of around 10–15 minutes, performed most days or a few times per week, can still improve agility and balance. As Mind Elevate explains:
"It's better to exercise a little, but regularly, than once a week, but for a long time. Even 10-15 minutes a day will bring tangible results."
For instance, a 2019 study published in the European Journal of Cardiovascular Nursing found that older adults with heart disease who performed 20 minutes of stability and coordination exercises twice a week significantly improved their balance and strength.
Recommended Frequency and Duration
To enhance coordination, aim for 15–30 minutes of practice, 3–5 times weekly. However, clinical evidence also supports shorter sessions, such as 20 minutes twice per week, for noticeable improvements. Advanced power protocols, such as French Contrast Training, are often programmed around three sessions per week to drive neuromuscular adaptation in trained athletes.
In one 2024 study involving 30 male college-level field hockey players, a 12-week program with three weekly sessions led to an 8.5% improvement in speed and a nearly 42% increase in anaerobic power.
If you're just starting, begin with 2–3 sessions a week and adjust as needed based on your recovery and progress. Spacing out sessions allows your nervous system to adapt and helps you avoid overtraining.
Recovery plays a key role in improving coordination over time, since muscles need to repair and adapt between training sessions.
Prioritizing Quality over Quantity
When it comes to these drills, precision is far more important than speed or intensity. The focus should be on performing each movement with perfect form before trying to go faster. Using a mirror or asking a partner to check your technique can be helpful. As Mind Elevate suggests:
"When you start, focus on getting the movements right, not how fast you can go. You can speed up later."
By mastering proper motor patterns early on, you set the foundation for safely adding speed and intensity later. Rushing through drills with poor form not only builds bad habits but also increases the risk of injury.
Adapting Drills for Different Fitness Levels
As you progress, it’s important to adjust the drills to match your fitness level. These exercises can be scaled to suit a wide range of abilities:
- For beginners: Start on stable surfaces and focus on bilateral movements. Slow, controlled motions are key to developing movement quality and supporting the neural adaptations that underpin coordination.
- For intermediate levels: Incorporate unstable surfaces, such as foam pads or Bosu balls, and add more complex movements like single-leg Romanian deadlifts.
- For advanced athletes: Introduce explosive plyometrics and agility drills that require quick, reactive adjustments. You can even challenge yourself further by performing balance drills with your eyes closed to rely more on proprioception.
If you're not ready for heavy resistance, swap out weighted exercises for bodyweight alternatives. For example, replace heavy back squats with goblet squats or use bodyweight plyometrics instead of loaded jumps. The key is to master the basics first and then gradually increase the difficulty by adding resistance or unstable conditions. By applying these principles consistently, you'll see improvements in the coordination drills outlined earlier.
Why You REGAIN Strength, Size, & Skills FASTER: Muscle Memory
Conclusion
The Role of Neuromuscular Coordination in Performance
As Speediance Europe explains, "Neuromuscular coordination is the foundation of smooth, efficient movements, playing a vital role in athletic performance and injury prevention." The five drills highlighted here - single-leg balance, agility ladder drills, dynamic stability movements, reactive cone drills, and soft landing techniques - work together to fine-tune the communication between your brain and muscles. This improved coordination helps recruit motor units more effectively, making movements more precise, powerful, and energy‑efficient. Together, they create a well-rounded approach to enhancing neuromuscular coordination.
Beyond athletic performance, these drills come with practical perks. Enhanced proprioception and better landing mechanics significantly reduce the risk of injuries, whether on the field or during daily activities. Studies also show that coordination exercises can significantly lower the likelihood of falls. Whether you're chasing peak performance or simply aiming for better stability in everyday life, these drills deliver tangible benefits.
Encouragement for Long-Term Practice
To truly maximize these gains, consistency is key. Thanks to neuroplasticity - the brain adapts with repeated practice, leading to more efficient neural patterns that support skilled movement. This is why sticking to a routine is far more effective than sporadic, high-intensity efforts.
Focus on quality over quantity. Performing drills with proper technique reinforces correct movement patterns, while rushing through them with poor form can lead to bad habits and even increase injury risk. Start at a level that matches your current ability, master the basics, and gradually increase the difficulty as your coordination improves. A steady, methodical approach ensures you reap the full benefits of these exercises.
By investing in neuromuscular coordination training now, you set yourself up for long-term advantages. Consistent practice can help slow age‑related declines in balance and functional mobility, supporting independence as you age. Whether you're aiming to shave seconds off your sprint time or move through daily life with more confidence, these five drills equip you with the tools to perform better, move more efficiently, and stay injury-free.
For more information about the human body and additional anatomy resources, visit the Institute of Human Anatomy.
FAQs
How do I know which drill to start with?
The type of drill you choose should align with your fitness level and what you’re aiming to achieve. If you’re just starting out or want to improve coordination, focus on sensory warm-ups or balance exercises. These can help you build better body awareness.
For those looking to enhance visual focus and eye coordination (e.g., for near‑vision tasks), drills like pencil push‑ups can be helpful. To improve whole‑body reaction time for sport, reactive agility or cone‑based drills are more appropriate. On the other hand, if you’re more experienced, you might want to challenge yourself with agility or plyometric exercises to push your limits.
Before diving in, it’s a good idea to do a basic assessment. This helps pinpoint areas that need work, so you can pick drills that address those specific needs.
When should I add harder progressions like eyes-closed or unstable surfaces?
When you've built a strong base of coordination and balance, you can step things up with tougher progressions like closing your eyes or working on unstable surfaces. These advanced exercises push your neuromuscular system, helping to improve proprioception (your sense of body position) and overall stability. The key is to add them slowly and deliberately, always prioritizing proper form and safety to get the most out of these drills while keeping injury risks low.
Can I do these drills if I have knee or ankle pain?
If you're dealing with knee or ankle pain, it's important to consult a healthcare professional before attempting these drills. Certain movements could potentially aggravate your condition. Exercises such as ankle mobility and balance drills can help improve stability and support rehabilitation, but they may require adjustments to prevent discomfort. Getting personalized guidance ensures the exercises are both safe and appropriate for your situation.

